
Deerling Mod Crochet Pattern
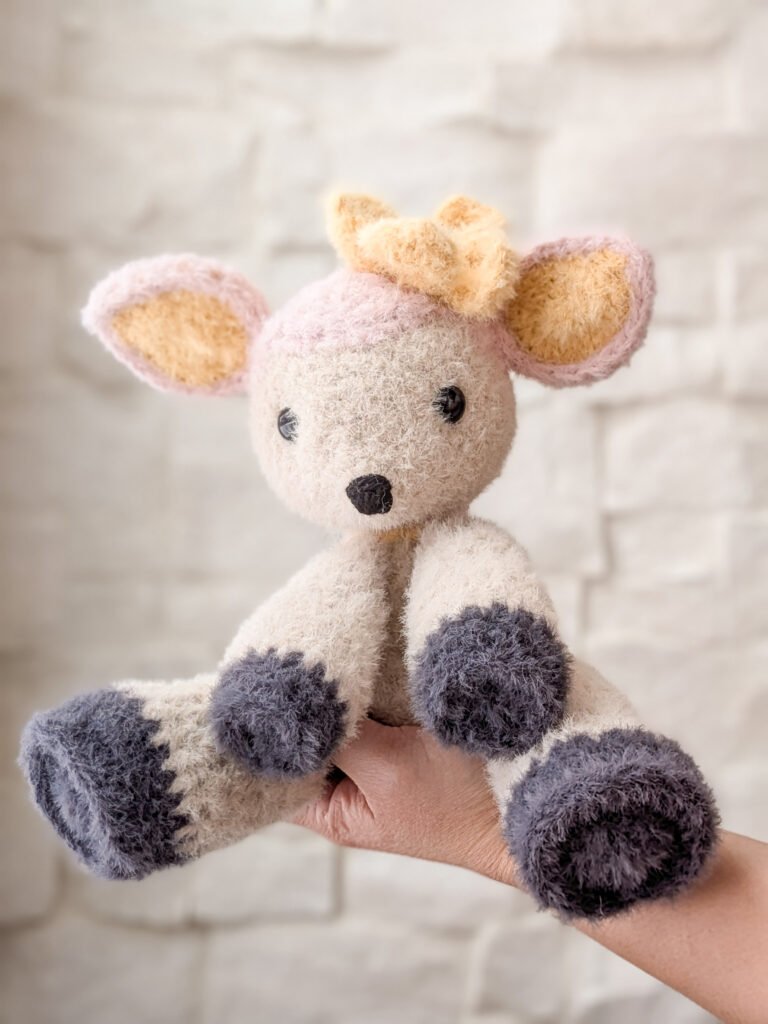
If you’re looking for a Deerling crochet pattern, a Pokémon amigurumi modification, or a cute way to turn a fawn plush into a Pokémon-inspired creation, you’re in the right place! This Deerling crochet pattern modification is based on the Renee the Fawn Plushie (Plush Version) by Irissesile, with color adjustments and small visual tweaks to capture the soft, nature-inspired look of Deerling from Pokémon.
In this blog post, I’ll walk you through how to modify the Renee the Fawn crochet pattern into a Deerling amigurumi, focusing on color changes, yarn placement, and Pokémon-accurate details. This crochet mod is perfect for Pokémon fans, amigurumi makers, and anyone who loves creating character-inspired plushies while using an existing base pattern.
Because this Deerling plush is a pattern modification, I won’t be sharing the full original pattern here. Instead, you’ll find instructions for color swaps, stitch notes, and design adjustments to help you transform the base fawn plush into a recognizable Deerling crochet plush. This approach lets you stay respectful to the original designer while still creating a unique, handmade Pokémon crochet piece.
Whether you’re expanding your Pokémon crochet collection, creating a gift for a fellow fan, or simply love woodland-themed amigurumi, this Deerling crochet mod pattern is a fun and creative project to add to your lineup. Grab your hooks and yarn—let’s bring this adorable Grass-type Pokémon to life in plush form!
What You’ll Need
Pattern
The >> Renee the Fawn plush pattern << by Irissesile
Ready to crochet your own Deerling amigurumi? Grab your yarn in soft pink, yellow, black and creamy neutrals, and let’s begin this adorable little fawn crochet project!
Tools
Material
- Yarn
- Feel like bliss by lion brand: in blush pink, buttercup, sand dollar, and slate
- Hook (4.5mm)
- scissors
- poly fill
- plastic eyes (14mm)
Abbreviation
- Sl st: slip stitch
- St(s): Stitch(es)
- Sc: single crochet
- Inc: single crochet increase. 2 single crochet in 1 stitch
- Dec: single crochet decrease
- Hdc: half double crochet
- Hdc inc: half double crochet increase. 2 hdc in 1 stitch
- Hdc dec: half double crochet decrease. Yarn over, insert the hook in front loop of the next 2 stitches, yarn over, pull through all the loop
- Tr: treble crochet
- Qt: Quadruple Treble Crochet
- BB: bobble stitch. Yarn over, insert the hook, yarn ove, pull though 2 loops, repeat for 5 times. You should have 6 loops on the hook, yarn over and pull through all the loop
- FO: fasten off
- MR: magic ring
- Ch: chain
Pattern
Front Legs
Start with black color for R1-3, then change to beige
Back Legs
Start with black color for R1-4, then change to beige
Ear
Crochet inner ear in yellow and outter ear in blush pink
Noted: I sew on the legs adn ears later instead of crochet it on the body and head.
Body
Note: I recommend keeping the Renee the Fawn pattern open alongside this section, as I only note where the color changes occur. You will follow the original Renee pattern for all stitches and construction. Stitch count: Dec/hdc2tog = 1 stitch, Inc = 2 stitches.
Bold text indicates stitches crocheted in blush pink, while regular text indicates stitches crocheted in beige.
R1 2 st, 4 st, 2 st
R2 4 st, 8 st, 4 st
R3 6 st, 12 st, 6 st
Crochet 4 Hdc then start R4
R4 3 st, 15 st, 18 st
R5 4 st, 15 st, 17 st
Skip tail attachment for the nexk round as we will sew it on later
R6 4 st, 15 st, 17 st
R7 4 st, 14 st, 12 st
In R8 Omit the bobble and crochet 1 hdc instead of a bobble stitch
R8 4 st, 11 st, 9 st
R9 4 st, 12 st, 8 st
R10 5 st, 11 st, 8 st
R11 4 st, 8 st, 6 st
FO beige and crochet R12 in blush pink
Use yellow yarn to embroider along the color-change edge, following the natural curve as closely as possible. Don’t worry if a bit of beige shows through the blush pink—this can be corrected later by embroidering over the area with blush pink yarn if needed.
For the yellow spot on the body, embroider the spot using yellow yarn.
Arms and Legs are attached near the edge of the yellow curve
Head
Follow the Renee the Fawn pattern except for R13
R1-11 in beige
change color to blush pink on R12
R13 13 sc, BLO (14 sc), 13 sc
Plastic eyes 14 mm, attach on R7/8, 10 st apart
Once you finish crocheting the head, flip the nose section away from you. Attach the blush pink yarn to the first remaining front loop on your right (for right-handed crocheters).
R1 sc, dc, sl st, sc, dc, tr, qt, qt, tr, dc, sc, sl st, dc, sc, ch 1 & turn
R2 3 sl st, sc, 6 Hdc, sc, FO, leave long tail
Sew the edge of R2 to the head of the fawn
embroider the nose with black colored yarn
Tail
with blush pink yarn
R1 4 sc in MR
R2 (Hdc, Hdc inc) x 2 (6)
R3 (2 Hdc, Hdc inc) x 2 (8)
R4 (3 Hdc, Hdc inc) x 2 (10)
R5 4 Hdc, Hdc inc, 4 Hdc, (bbl, slst in the same stitch) (12)
R6 (2 Hdc , Hdc dec) x 3 (9)
R7 (Hdc, Hdc dec) x 3, FO, leave long tail for sewing.
Attach the tail to the bottom of the Fawn as shown in pictures above
Flower
Special stitch
Dc5tog: [yarn over, insert hook in the st, yarn over, pull up, yarn over, pull through 2 loops] Repeat this step 5 time. You will have 6 loops on the hook, then [yarn over pull through 2 loop] until you have 1 loop on your hook.
R1 12 sc in MR
R2 [ch3, Dc5tog, 2 sc in between the next 2 dc on Dc5tog, ch 2, 2 sc in between the next 2 dc on Dc5tog, then Sl st in the same stitch on R1, skip 1 st, sl st in the next] repeat this for the total of 5 times.
Here is a vdo example of how you do the petal (start at 3:47)
Thanks for stitching along! If you make your own Deerling, I’d love to see it.
Tag me on social media or share your photos in the comments!
If you enjoyed this mod, don’t forget to save the pin, share the post, or explore more of my pattern modifications!